Friday, 28 December 2018

Study Task 3: Research - Aesthetics

As our animation tells a tale of a journey and of magic, the aesthetics of a 2D cut-out style works very well in conveying a storybook feel, perhaps because the medium imitates the aesthetic of a storybook illustration (Kuula, 2016). Other than Breadwinner, this cut-out effect is used in a few animations to portray a fable-like tale. An example of this is seen in the Tale of Three Brothers segment of Harry Potter and the Deathly Hallows (Warner Bros, 2012).

Although the 2D medium was chosen by the group due to preference, one cannot deny the benefits of its versatility. For example, The Little Prince uses stop motion segments with intentional paper textures to portray a contrast between the real world (which is animated in 3D) and a storybook world (Netflix, 2016).

This storybook aesthetic is also what we are aiming for and a large part of the appeal in the group's animation also stems from the use of textures; but we can use overlays to simulate this effect without the need for puppets. Arguably though, this comes at the cost of producing something that might not look authentic as it would by using a real cut out (On The Set, 2018).

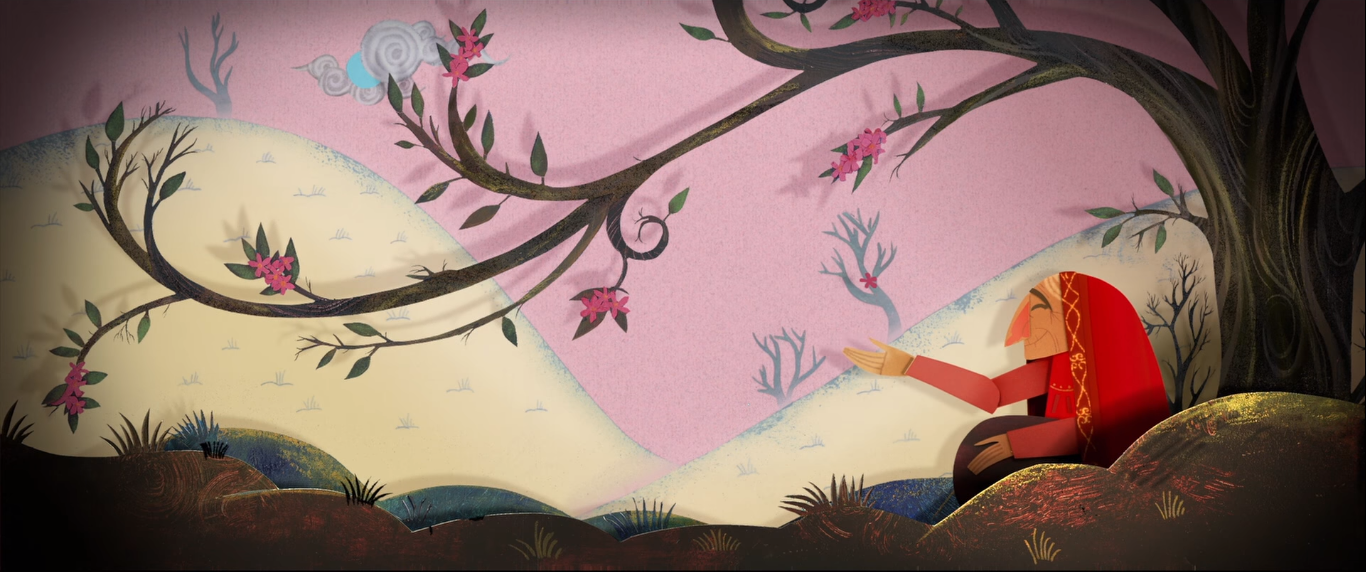
Breadwinner's story world sequences had a storybook aesthetic about it

The animated segment in the Deathly Hallows goes for a more Reiniger style of cut out aesthetic 

An example of an animation using a 2D digital cut out aesthetic (combining use of Photoshop and After Effects)

Bibliography:


Grace and Shirlene (2013), 'Paper Cut Out Animation', Vimeo, Available at: https://vimeo.com/45743496?fbclid=IwAR1sH0SAGMN729R5YlnduVgvE24j_9g3NdtrWnDayzjht2VbmLOSCxWrcP8 (Accessed 8 Jan 2019)

Kuula, I. (2016), 'Using Animation to Illustrate a Storybook', Degree Programme in Media and Arts, Tampere University of Applied Sciences, Finland

On The Set (2018), 'The Breadwinner [An Introduction to the Animation Process]', YouTube, 7 March, https://www.youtube.com/watch?v=KtRM8f-mCTk (Accessed 8 Jan 2019)

Warner Bros (2012), 'Behind the Scenes: Animating the 'Tale of the Three Brothers'', Pottermore, Available at: https://www.pottermore.com/features/tale-of-the-three-brothers (Accessed 8 Jan 2019)


Netflix (2016), 'The Little Prince, Animation Featurette', YouTube, 15 November, Available at: https://www.youtube.com/watch?v=TWKSVx1hgXo (Accessed 8 Jan 2019)

Study Task 3: Research - Technique

The group's animation went in an unexpected direction and veered towards a digital cut-out (but still 2D) style. The decision to animate in 2D stemmed from group preference, however the digital cut-out style is new to the group as a whole.

The technique involves scanning in textures and overlaying them on the animation and limiting the colours as well as the movement of the characters to a certain extent. A similar method of using scanned textures is used in shows such as South Park (South Park Studios, 2013).

Animations that use a cut-out style such as in the story world sequences of the Breadwinner revealed difficulties in animating this style in a digital software, mainly in the form of simulating the look and feel of paper and imitating the imperfections one would find in handcrafted animation (On The Set, 2018). These limitations however are arguably counteracted by the benefit of being able to edit frames and do pose to pose animation on a medium that is essentially simulating a straight ahead stop motion medium (The Flying Animator, no date).

Textures can be still be seen in South Park although it's not animated with construction paper anymore

Using a digital software to simulate a cut-out animation on The Breadwinner

Bibliography:

On The Set (2018), 'The Breadwinner [An Introduction to the Animation Process]', YouTube, 7 March, https://www.youtube.com/watch?v=KtRM8f-mCTk (Accessed 8 Jan 2019)

South Park Studios (2013), 'FAQ: Do you still use construction paper to animate the show?', South Park Studios,

The Flying Animator (no date), 'Cut Out Animation Rages Through the Ages', The Flying Animator, https://www.the-flying-animator.com/cut-out-animation.html (Accessed 8 Jan 2019)

Sunday, 23 December 2018

Study Task 2: Talk This Way

We were taught how to lip sync by making a phoenome mouth chart and planning the placement of the keyframes through use of a dope sheet before using After Effects to actually do it.

The dope sheet planning


My phoenome 'cheat sheet'


This was the resulting animation (I used my Captain Flintlock character from last year!):


What I learned:
  • Certain mouth positions can be shared for multiple sounds
  • How to lip sync by using time mapping in After Effects
  • Using a dope sheet works well to give a general idea of where to put the keyframes but I personally needed to edit the positioning of the keyframes quite a bit in After Effects

What worked well:
  • Using time remapping in After Effects made lip syncing much easier than traditionally drawing it frame by frame
  • Offsetting the frames one or two frames before the start of the sound

What could be improved:
  • I could have planned out the keyframes on the dope sheet a bit better
  • I feel that an extra tween phoenome might have made parts of the lip syncing smoother
  • Only lips were required for this task but as I added a background, I will keep in mind that for future reference I might need to move other parts of the face like the cheeks and chin to make the lip movement look more natural.

Thursday, 20 December 2018

Telling Tales - Week 12

This week I've taken a break from this module to focus on COP which I've started to lag behind on. While Emily and Natalie are working on finishing their parts of the animation, I will work on getting the pre-production booklet done and clean up any other parts needed for submission.

Wednesday, 12 December 2018

Telling Tales - Week 11

I wanted to finish my parts before the final critique and try to enjoy my Christmas break so with a great amount of effort, I managed to finish off my part of the character animation.

These were the roughs for the walking parts:


The most time consuming part to animate was the stepping stone segment but I really liked how it turned out in the end.

The final animation with Nat and Emily's parts added looks like this so far:


What worked well:
  • The boiling title
  • The subtle map folding and easing in the map movement
  • Limited animation on walk cycles to fit the cut out style
  • The stepping stones part worked well
  • Extending the time on the split screen segment

What could be improved:
  • Movement of Shireen's hand offering coin to peasant may be too subtle

Wednesday, 5 December 2018

Telling Tales - Week 10

Emily finished the character designs for the elderly Shireen, giving us all enough to make a start on the actual animation. I did the character animation for the very beginning and this was the results of the test:


What worked well:
  • Paper cut out style looks great against the textured backgrounds
  • The boiling works well
  • The character is consistent with the character designs

What could be improved:
  • Making the map movement less linear
  • Folding the map slightly as she's pulling it down
  • The title doesn't quite fit the style - I'll try animating it by hand and boiling it too

Wednesday, 28 November 2018

Telling Tales - Week 9

Following this week's group critique, we were advised to complete the character designs as it is the only thing needed now to start the actual animating. Emily took over the task of completing the character designs while Natalie's main focus will be sounds. I also took some videos of Natalie for us to use as a reference later.

Dotty gave some insight into the ending and we've decided to change it to something less depressing and she advised that it was better to keep the scarf texture static otherwise it was too distracting. while Emily focused on finishing the character designs this week, I made the treasure map asset and edited Emily's ending storyboards to fit the new ending (belatedly realising I drew the hands from the wrong perspective but the team are aware of this) and this has been updated into the animation in progress.

The treasure map asset (There is space at the top for the title)

Emily also made a suggestion to suddenly cut off the music near the end and the resulting ending is now effectively far more dramatic. 


Original version with placeholder music continuing to the end

New version with dramatic music cut off at end

What worked well:

  • Changing the ending storyboards
  • The dramatic version of the animatic works better

What could be improved:
  • The split screen segments need to hold for longer to give more time to absorb what's going on in the scenes


Wednesday, 21 November 2018

Telling Tales - Week 8

This week I made a couple more backgrounds and added some placeholder sounds to an updated animatic. It took a few attempts before I got the textures and colours I wanted and Emily's advice on this was very helpful.


Testing out different textures for the back wall and the pillars
Final background with a purple theme
I particular had a lot of fun with the mirror long shot. After much experimentation it boiled down to four mirrors and we picked the one that suited the setting the best.

All four choices were substituted into the animation but the fourth mirror was best suited due to the mystical feel

I also experimented with the colours and Emily and I decided on a goldish mirror to make it stand out

Following this I tested out some alpha matting effects for this background within the animation with the following results.


I added some blurring to the foreground for some depth and Emily really liked it too

I also made two different versions of the animation in progress with some added placeholder sounds, and people seem to be veering more towards the style of the second version.


First version of the animatic with sounds

Second version with different sounds and placements


What worked well:
  • Purple colour scheme of cave interior backgrounds
  • The mystical mirror design and colours
  • the blue fire alpha matting

What could be improved:
  • The title should fade out before the map goes down


Friday, 16 November 2018

Telling Tales - Week 7

This week I was mostly in MAF, however before I left I was able to sneak in another background for the animation.


We also applied much of Dotty's advice and the animatic has been cut down substantially since its original size.


We got the lineart character turnaround for the elderly Shireen and Emily played around with some flowery textures that we all chipped in on. I wanted to use an effect to keep the scarf texture static while the character moves and Emily made a boiling lineart test for me to test the effects in AfterEffects.

Testing the Alpha Matting effect with different textures


Testing the same effect with the boiling lineart

With the backgrounds in place we've come to the agreement that the reddish scarf suits the animation better.

What worked well:

  • The new background being consistent with the other backgrounds in the animation
  • Changing the beginning to shorten the time
  • The reddish scarf texture
  • I liked the alpha matting effect on the scarf texture

What could be improved:
  • Adding placeholder sounds to the animatic


Monday, 12 November 2018

Telling Tales - Week 6

Emily started using my storyboard panels as a direct guide to make a start on the backgrounds and play with some textures.


Original storyboard panel


Emily's background using my storyboard as a guide

We decided to use the animatic as the skeleton for the actual animation by swapping the storyboard assets for the final ones and we tested this out on one part of the animatic to find that it worked well.

Animatic with updated background and Emily's storyboards

Natalie was unable to come in for the group crit this week and Matt made a point to iterate that we should be concerned about the lack of a definitive character design, so we later managed to catch up with her and give her a nudge in the direction of the character design we wanted. Meanwhile, the class suggested using real materials like clothes as textures for the backgrounds and Emily's test on this looked superb in my opinion.

The same background with overlaid textures from scanned clothes (thanks to Emily!)
Later over the weekend, I managed to imitate Emily's style well enough to chip in with the backgrounds, which are all coming along quite nicely.


Original storyboard panel

My attempt at making a background consistent with Emily's style
What worked well:
  • Storybook style of backgrounds
  • Overlaying real textures on backgrounds
  • Using storyboards as direct guide to backgrounds
  • Consistency with Emily's style

What could be improved:
  • Personal time taken to make backgrounds

Monday, 5 November 2018

Telling Tales - Week 5

While Natalie was in ceramics class, I touched base with Emily and showed her the animatic in progress (which she loved) and the issue with the timing. She came up with the brilliant idea of split screening one section of the animation effectively cutting six panels into three. 


Original storyboard panels from second page

Updated panels now split screen

She also showed me her boards which I also loved except for a part that was essentially a flashback within a flashback. After we collectively picked out things to cut out and edit, I spent the rest of the week re-editing and cleaning up the rest of the boards and made my segment of the animatic, minus the sounds.


What worked well:

  • Split screen montage is looking good

What could be improved:
  • Will need to update the animatic with Emily's segment

Thursday, 1 November 2018

Telling Tales - Week 4

I bumped into Emily just to make sure we were all on the right track. At some point I decided to clean up a few of my storyboard panels to make them easier to edit as an animatic and I tested out the first few panels in After Effects and I really liked how it looked, but I can already see that timing is going to be an issue and it's looking like the animation will run well over a minute. This is something I'll bring up to the team on our next meeting.

Saturday, 27 October 2018

Telling Tales - Week 3

We've made some changes to our schedule this week after discussing the script and adding some fine tuning here and there, with some general advice from Dotty. Natalie's networking powers got us an interested music student from Leeds University who wants to make sounds and music for our animation. As Dotty pointed out, the animatic should be sorted pretty quickly to give them something to work with, so Emily and I are focussing on getting storyboards finished while Natalie focusses on the character designs.

Wednesday, 17 October 2018

Telling Tales - Week 2

This week we met up as a group and made a general plan of when we should get everything finished by. I made a rough script that Emily really liked but will need some tweaks regarding the mirror scene near the end of the animation. We also experimented with different styles on the computer and now have a general idea of what kind of background we're looking for, but our personal task for this week will be to do some research.

I made some doodles to bounce off some ideas of a possible character design for the main character

Tuesday, 16 October 2018

Telling Tales - Week 1

A new year a new module! This week we were introduced to group projects, with our teammates and story ideas being picked by chance. My new teammates for this project are Emily and Natalie and I'm looking forward to working with them on our first group animation! We had to use story cubes as the source of inspiration for our pitch and my cubes were a baby, a mirror and an old lady.


The die that fate dealt me

I ultimately decided to pitch the story of an elderly lady who goes on a quest to find a magical mirror to relive the memory of her lost child, and was surprised when it got picked by the class. As Emily is good with organising deadlines and was generally eager for the part, she was dubbed the director.

Monday, 14 May 2018

LAUAN404 Summative Evaluation

At the start of this module I had a fairly good concept of the 12 principles of animation but hadn’t applied them to much beyond 2D and the odd plasticine animation. Over the last few months I have learnt how to create a stop motion puppet from nothing more than a bit of wire, gauze, tape and plasticine; I have been introduced to the iceberg of a program that is Maya and the concept of 3D; and I have been given a taste of what it feels like to create something for a wider industry beyond the confines of the university through the Beano brief. I have also learnt something that has terrified me for years before going into animation: walk cycles.

What went well and why:

  • Beryl’s final design was sufficiently modern yet Beano at the same time.
  • The slingshot arc and follow-through in the final animation came out very fluid (perhaps because it was accidentally animated at 30fps).
  • The lip syncing came out quite accurate due to trial and error and much personal facial mimicking.
  • Mark’s walk cycle and turn near the end of the main animation turned out very smooth, likely because the cycle was animated on ones (and took a few days to get right).
  • Beryl’s guitar rocked. In both 2D and stop motion.
  • The fact that I finished animating the minimum 40 seconds on time as a side effect of me under-estimating how much I’d be able to get done before the deadline.

What could have been improved and what can be applied in future:

  • The 3D aspects of the module were personally difficult and I would like to practise this further to be more fluent with Maya. I would eventually like to learn how to make hybrid 2D and 3D animation with these skills.
  • Though my puppet looked good, it was hard to move specific parts because they were heavy (the feet) or kept cracking (the arms). In future I know to focus more on the padding so I don’t bog it down with too much plasticine. However, developing props is not something I’d mind looking further into in the future.
  • My bully was supposed to have an angry brooding walk but I think it ended up being more ‘vanilla’ than intended. Adding character to a walk cycle is something that I will need to practise further.
  • Time was a big barrier when it came to the final animation and I found myself using ‘cheats’ to finish in time, like showing a brief flash of white instead of animating the slingshot actually hitting Mark’s face. That being said, I think I would apply shortcuts like this in the future if I find myself pressured for time.

It has been an incredible learning experience but not without its obstacles. I may have had a conniption trying to decide on a single colour scheme for my redesigned Beryl the Peril and as amateurish as my artistic skills are, it was easy to compare my work to that of my more talented peers (despite me being fully aware of everyone’s differing ‘levels’). I feel like my time was managed fairly well between the modules and the feedback I received throughout the course has been valuable. I hope the upcoming summer break will provide ample opportunity to bring my artistic abilities closer to my personal level of expectation. Until then, I look forward to another year of learning the wonder that is animation!

Wednesday, 9 May 2018

Final Animation Progress Evaluation

Miraculously, I have managed to pull off around 45 seconds of fully animated segments (including credits)!

Final animation progress

What worked well:
  • Mark's walk cycle and turn-to-front
  • Princess' run cycle
  • The sounds in general work well
  • Good flow of narrative

What could be improved:
  • Finishing the whole animation at some point
  • Animating the slingshot actually hitting Mark's face instead of a flash of white
  • More exaggeration on the zooming in on Beryl's face
  • Tweaking the timing of the rock hitting the hand which looked fine in the After Effects preview but rendered to be slightly slower than I would have liked.

Monday, 7 May 2018

Study Task 10 - Preparing and Presenting my work

In this week's session, we presented the progress we had done on our animations so far to the rest of our peers for a final critique and feedback. The critique I got was as follows:


The feedback was very positive overall. My main aim is to tweak the timing here and there in the final animation and if I have time, I'll add the suggested extras like rubble.

Sunday, 29 April 2018

Study Task 9 - Walk Cycles 2D, 3D and Beyond

This week was all about walk cycles. We were first thrown in the deep end and asked to try it out ourselves with our stop motion puppets.


Beryl puppet walk cycle

My puppet sadly has lead shoes and prefers to slide rather than walk, although it still came out better than I expected for a first attempt.

We were then taught how to do a basic 24 frame walk cycle by breaking it down into 8 frames and then tweening them until they amounted to 24 frames.


Basic 8 frame walk cycle learned in class

We then applied this to a character (or in my case, Mark from the Beano animation).

Guide for my Beano walk cycle (that I ultimately flipped for the scene)

Mark's walk cycle

Using what we learned with key frames and the graph editor in Maya, we made the Moom character walk too.


The Moom-Walk

What worked well:

  • Both walk cycles turned out a lot smoother than expected
  • Adding follow through to Mark's clothes

What could be improved:
  • More experimentation to add character and emotion to a walk
  • The follow through on Mark's hood could have been a bit better

Monday, 16 April 2018

Study Task 4 - Maya 5: Animation basics

In this Maya session we learned how to animate using keyframes and the graph editor. I was initially trying to animate the squash and stretch of a ball bounce by directly changing the size and dimensions of the sphere until we were shown how to use the squash property, though I think I need more practice playing around with this function because it ended up looking a lot less natural than my manual method. Given more time I would fix this.


What worked well:
  • The motion was very fluid

What could be improved:
  • Altering the easing and the values of the squash at certain points to make the movement look more natural

Tuesday, 20 March 2018

Study Task 7 and 8 - Animatics and Soundscapes; Keyframes, Extremes and In-Betweens

For the animatic, I finished off all the backgrounds to be used in the animation and fully animated the segment where Beryl is caught by Mark the bully. As a result, the actual animatic was very time consuming to make but I'm hoping it has saved me time in the future.

Beryl the Peril Animatic (The version submitted to DNAD was anonymised as per their requirements) 


The creative process for the animatic (and stop motion puppet)

What worked well:
  • The choice of sound and voice acting
  • The arcs and follow through in the slingshot
  • The lip syncing
  • The story can be followed fairly easily

What could be improved:
  • Timing will have to be tweaked here and there for the actual animation
  • Some movements will potentially be difficult and/or time consuming to animate for the final piece (like Princess' run cycle)
  • Further development of keyframes, extremes and in-betweens for the final part

Tuesday, 6 March 2018

Study Task 6 - Scripting and Storyboarding

My original script for the Beano animation gave the little girl a much bigger role to play but the majority of it ultimately had to be cut to keep the animation within a reasonable time frame.

Original script

I made some rough thumbnails for the storyboard as a guide but for the actual animatic, I'll be completing the backgrounds and doing as much of the animation as possible to save time on it in the future.

Rough storyboard

Sleep Paralysis and You - Final Version

This is the final version of Sleep Paralysis and You after Prathik has composited in all our parts. It's been a long few months an...