Saturday, 27 October 2018
Telling Tales - Week 3
We've made some changes to our schedule this week after discussing the script and adding some fine tuning here and there, with some general advice from Dotty. Natalie's networking powers got us an interested music student from Leeds University who wants to make sounds and music for our animation. As Dotty pointed out, the animatic should be sorted pretty quickly to give them something to work with, so Emily and I are focussing on getting storyboards finished while Natalie focusses on the character designs.
Wednesday, 17 October 2018
Telling Tales - Week 2
This week we met up as a group and made a general plan of when we should get everything finished by. I made a rough script that Emily really liked but will need some tweaks regarding the mirror scene near the end of the animation. We also experimented with different styles on the computer and now have a general idea of what kind of background we're looking for, but our personal task for this week will be to do some research.
 |
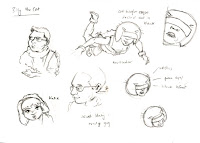
| I made some doodles to bounce off some ideas of a possible character design for the main character |
Tuesday, 16 October 2018
Telling Tales - Week 1
A new year a new module! This week we were introduced to group projects, with our teammates and story ideas being picked by chance. My new teammates for this project are Emily and Natalie and I'm looking forward to working with them on our first group animation! We had to use story cubes as the source of inspiration for our pitch and my cubes were a baby, a mirror and an old lady.
I ultimately decided to pitch the story of an elderly lady who goes on a quest to find a magical mirror to relive the memory of her lost child, and was surprised when it got picked by the class. As Emily is good with organising deadlines and was generally eager for the part, she was dubbed the director.
 |
| The die that fate dealt me |
I ultimately decided to pitch the story of an elderly lady who goes on a quest to find a magical mirror to relive the memory of her lost child, and was surprised when it got picked by the class. As Emily is good with organising deadlines and was generally eager for the part, she was dubbed the director.
Monday, 14 May 2018
LAUAN404 Summative Evaluation
At the start of this module I had a fairly
good concept of the 12 principles of animation but hadn’t applied them to much
beyond 2D and the odd plasticine animation. Over the last few months I have
learnt how to create a stop motion puppet from nothing more than a bit of wire,
gauze, tape and plasticine; I have been introduced to the iceberg of a program
that is Maya and the concept of 3D; and I have been given a taste of what it
feels like to create something for a wider industry beyond the confines of the
university through the Beano brief. I have also learnt something that has
terrified me for years before going into animation: walk cycles.
What went well and why:
- Beryl’s final design was sufficiently modern yet Beano at the same time.
- The slingshot arc and follow-through in the final animation came out very fluid (perhaps because it was accidentally animated at 30fps).
- The lip syncing came out quite accurate due to trial and error and much personal facial mimicking.
- Mark’s walk cycle and turn near the end of the main animation turned out very smooth, likely because the cycle was animated on ones (and took a few days to get right).
- Beryl’s guitar rocked. In both 2D and stop motion.
- The fact that I finished animating the minimum 40 seconds on time as a side effect of me under-estimating how much I’d be able to get done before the deadline.
What could have been improved and what can be applied
in future:
- The 3D aspects of the module were personally difficult and I would like to practise this further to be more fluent with Maya. I would eventually like to learn how to make hybrid 2D and 3D animation with these skills.
- Though my puppet looked good, it was hard to move specific parts because they were heavy (the feet) or kept cracking (the arms). In future I know to focus more on the padding so I don’t bog it down with too much plasticine. However, developing props is not something I’d mind looking further into in the future.
- My bully was supposed to have an angry brooding walk but I think it ended up being more ‘vanilla’ than intended. Adding character to a walk cycle is something that I will need to practise further.
- Time was a big barrier when it came to the final animation and I found myself using ‘cheats’ to finish in time, like showing a brief flash of white instead of animating the slingshot actually hitting Mark’s face. That being said, I think I would apply shortcuts like this in the future if I find myself pressured for time.
It has been an incredible learning
experience but not without its obstacles. I may have had a conniption trying to
decide on a single colour scheme for my redesigned Beryl the Peril and as
amateurish as my artistic skills are, it was easy to compare my work to that of
my more talented peers (despite me being fully aware of everyone’s differing
‘levels’). I feel like my time was managed fairly well between the modules and
the feedback I received throughout the course has been valuable. I hope the
upcoming summer break will provide ample opportunity to bring my artistic
abilities closer to my personal level of expectation. Until then, I look
forward to another year of learning the wonder that is animation!
Wednesday, 9 May 2018
Final Animation Progress Evaluation
Miraculously, I have managed to pull off around 45 seconds of fully animated segments (including credits)!
Final animation progress
What worked well:
- Mark's walk cycle and turn-to-front
- Princess' run cycle
- The sounds in general work well
- Good flow of narrative
What could be improved:
- Finishing the whole animation at some point
- Animating the slingshot actually hitting Mark's face instead of a flash of white
- More exaggeration on the zooming in on Beryl's face
- Tweaking the timing of the rock hitting the hand which looked fine in the After Effects preview but rendered to be slightly slower than I would have liked.
Monday, 7 May 2018
Study Task 10 - Preparing and Presenting my work
In this week's session, we presented the progress we had done on our animations so far to the rest of our peers for a final critique and feedback. The critique I got was as follows:

The feedback was very positive overall. My main aim is to tweak the timing here and there in the final animation and if I have time, I'll add the suggested extras like rubble.
Sunday, 29 April 2018
Study Task 9 - Walk Cycles 2D, 3D and Beyond
This week was all about walk cycles. We were first thrown in the deep end and asked to try it out ourselves with our stop motion puppets.
My puppet sadly has lead shoes and prefers to slide rather than walk, although it still came out better than I expected for a first attempt.
We were then taught how to do a basic 24 frame walk cycle by breaking it down into 8 frames and then tweening them until they amounted to 24 frames.
We then applied this to a character (or in my case, Mark from the Beano animation).
Using what we learned with key frames and the graph editor in Maya, we made the Moom character walk too.
What worked well:
 |
| Beryl puppet walk cycle |
My puppet sadly has lead shoes and prefers to slide rather than walk, although it still came out better than I expected for a first attempt.
We were then taught how to do a basic 24 frame walk cycle by breaking it down into 8 frames and then tweening them until they amounted to 24 frames.
 |
| Basic 8 frame walk cycle learned in class |
We then applied this to a character (or in my case, Mark from the Beano animation).
 |
| Guide for my Beano walk cycle (that I ultimately flipped for the scene) |
 |
| Mark's walk cycle |
Using what we learned with key frames and the graph editor in Maya, we made the Moom character walk too.
 |
| The Moom-Walk |
What worked well:
- Both walk cycles turned out a lot smoother than expected
- Adding follow through to Mark's clothes
What could be improved:
- More experimentation to add character and emotion to a walk
- The follow through on Mark's hood could have been a bit better
Monday, 16 April 2018
Study Task 4 - Maya 5: Animation basics
In this Maya session we learned how to animate using keyframes and the graph editor. I was initially trying to animate the squash and stretch of a ball bounce by directly changing the size and dimensions of the sphere until we were shown how to use the squash property, though I think I need more practice playing around with this function because it ended up looking a lot less natural than my manual method. Given more time I would fix this.
What worked well:
What could be improved:
What worked well:
- The motion was very fluid
What could be improved:
- Altering the easing and the values of the squash at certain points to make the movement look more natural
Tuesday, 20 March 2018
Study Task 7 and 8 - Animatics and Soundscapes; Keyframes, Extremes and In-Betweens
For the animatic, I finished off all the backgrounds to be used in the animation and fully animated the segment where Beryl is caught by Mark the bully. As a result, the actual animatic was very time consuming to make but I'm hoping it has saved me time in the future.
What worked well:
What could be improved:
Beryl the Peril Animatic (The version submitted to DNAD was anonymised as per their requirements)
The creative process for the animatic (and stop motion puppet)
What worked well:
- The choice of sound and voice acting
- The arcs and follow through in the slingshot
- The lip syncing
- The story can be followed fairly easily
What could be improved:
- Timing will have to be tweaked here and there for the actual animation
- Some movements will potentially be difficult and/or time consuming to animate for the final piece (like Princess' run cycle)
- Further development of keyframes, extremes and in-betweens for the final part
Tuesday, 6 March 2018
Study Task 6 - Scripting and Storyboarding
My original script for the Beano animation gave the little girl a much bigger role to play but the majority of it ultimately had to be cut to keep the animation within a reasonable time frame.


I made some rough thumbnails for the storyboard as a guide but for the actual animatic, I'll be completing the backgrounds and doing as much of the animation as possible to save time on it in the future.


Original script
I made some rough thumbnails for the storyboard as a guide but for the actual animatic, I'll be completing the backgrounds and doing as much of the animation as possible to save time on it in the future.
 |
| Rough storyboard |
Friday, 2 March 2018
Study Task 4 - Maya 4: Backgrounds
This week we were using Maya to model out our Beano backgrounds as a means of previsualisation to help with the backgrounds and storyboarding. I ultimately made a model of the inside of the electronics store for one of my scenes, and also a tree which took a few attempts because Maya kept crashing.
What worked well:
What could be improved:
 |
| This was fun to make despite the number of attempts it took |
 |
| This acted as a reference to one of my 3D-ish scenes |
What worked well:
- Rotating my tree trunk cylinder before branching it out to add to that tree texture
- The store model became a good reference for one of my scenes
What could be improved:
- Changing the shape of the tree foliage so it doesn't look so much a like a Savannah tree
- Perhaps adding colour to my store scene
Wednesday, 28 February 2018
Study Task 2 Evaluation
What worked well:
What could be improved:
- Beryl's redesigned hair
- Beryl's cap, jacket and boots
- Beryl's final colour scheme
- The use of the guitar and slingshot in the dynamic poses
- I generally liked how the logo turned out
- The consistent use of stripes on the minor characters to keep the Beano style
- General references to the Beano developers in the characters
What could be improved:
- Keeping the characters consistent in proportion between poses in general
- I did feel like the background characters were somewhat generic
- General improvement in drawing and colouring style when it comes to backgrounds.
Monday, 26 February 2018
Study Task 2 - Character Design and Development (Character Line Up and Background)
I had a general idea of how I wanted my story to go and what kind of background characters would be in it. Using the same principles of character design we were taught in the beginning of the module, I came up with a few characters I liked.


Every character intentionally sports stripes somewhere on their clothing as a shoutout to the Beano style (though it's a bit harder to see on the gardener) and after some experimentation I went with classic villain colours for my bully. I also named the gardener and elderly lady after David Law and his daughter Rosemary (the original inspiration for Beryl).

Tuesday, 20 February 2018
Study Task 3 - Analogue Character Modelling and Realisation (Part 4)
We had to do an animation test using our stop motion puppets. The results were as follows.
Learning points:
Learning points:
- Wire frame plasticine models are hard to move in part without moving other parts with it
- It is difficult to maintain consistency of the plasticine due to this
- The prop guitar suited the puppet well
- For future reference I would wound the gauze tighter to avoid loose and heavy plasticine bits.
Monday, 19 February 2018
Study Task 3 - Analogue Character Modelling and Realisation (Part 3)
As part of my dynamic poses for Beryl, I had her jamming on an electric guitar and I thought this would be a nice addition to her plasticine model too. I drew out the parts of the guitar in Illustrator and got it laser cut and the lovely people in Woodworks helped me glue some of the pieces together. I glued the rest of it the next day and cut the heads off of nails to make the tuning keys.
 |
| Pieces for Beryl's guitar |
 |
| The guitar pieces were glued and nailed in place on a board while the glue dried |
 |
| The completed guitar |
 |
| Beryl the rocker! |
Study Task 5 - Maya 3: Moom
This week we were introduced to the Moom character in Maya and spent the session learning how to pose them to help us with previsualisation of our Beano dynamic poses.
What worked well:
 |
| Obligatory Saturday Night Fever pose |
 |
| Made a quick model guitar so it could pose like Beryl when she's rocking it out |
What worked well:
- Facial expressions
- The use of references to make the poses work
What could be improved:
- The rocker pose could be more exaggerated with more back and neck curving
Friday, 16 February 2018
Study Task 3 - Analogue Character Modelling and Realisation (Part 2)
I got a lot done in our full day of puppet making. I think the most difficult part of it all was to pad out the foamy bits and retrospectively, some parts would have been better if it were more tightly wounded.

I managed to finish covering the body in plasticine and all that was really left was the head and some odd details here and there, which I came in and finished off later in the week.

 |
| Almost done with the hair |
 |
| Made a cameo in Zhama's Angel Face in progress |
 |
| Puppet completed! |
 |
| The complete puppet turnaround of Beryl the Peril |
Monday, 12 February 2018
Study Task 2 - Character Design and Development (Dynamic Poses, Silhouettes and Logo)
For my dynamic poses I pulled some references from pictures of myself as well as a random picture from the internet.


It makes perfect sense to me that a 'peril' would own a slingshot and would be good at causing a bit of trouble with it. During my research of Beryl I learned that she owned an acoustic guitar (that she couldn't really play). I upgraded this to an electric guitar (that she still can't really play but is being self taught).
 The silhouettes were basically the dynamic poses blacked out plus an altered pose with the slingshot (also from reference).


It makes perfect sense to me that a 'peril' would own a slingshot and would be good at causing a bit of trouble with it. During my research of Beryl I learned that she owned an acoustic guitar (that she couldn't really play). I upgraded this to an electric guitar (that she still can't really play but is being self taught).


I had a few ideas for the logo too but the one I coloured out is the one that appealed to me the most.


Friday, 9 February 2018
Study Task 3 - Analogue Character Modelling and Realisation (Part 1)
We took our finalised designs down to Ceramics and thus began our first proper introduction into the world of stop motion and puppetry. It turns out our designs as they were printed out were a little too small to work with so they were scaled up on paper to use as a guideline to make the wire skeleton.

By the end of the week I had Beryl's wire skeleton done (including the joints) and her bulky parts foamed out. We had also taken our wood slabs and metal rods from previous wood and metal workshops and combined them to make the stand for our puppets.


By the end of the week I had Beryl's wire skeleton done (including the joints) and her bulky parts foamed out. We had also taken our wood slabs and metal rods from previous wood and metal workshops and combined them to make the stand for our puppets.

Tuesday, 6 February 2018
Study Task 2 - Character Design and Development (Final Turnaround)
Being the fickle creative that I was, I ended up making a couple more colour scheme options that gained some likes along with the few that I had posted on the blog, after I posted the options to the blog.

I ultimately went with one of the original Beano colour schemes that included blue and white stripes on the undershirt.

I was originally averse to this colour scheme on the original comic because I simply didn't like how the colours worked, but I felt it worked on the redesign because there was a level of symmetry in the colours on the top and bottom halves of Beryl's character design i.e. two reds, two blacks, two blue-and-white stripes. It also served as a nice shout-out to the original Beryl.

Monday, 5 February 2018
Study Task 5 - Maya 2: Lighting
This Maya session is where our previous photography inductions came in useful - we learned how to light up objects in a scene in Maya which entailed a knowledge of the types of lighting in a scene, i.e. the key light, back light and fill light. We also learned how to apply textures to objects. I like the flexibility and sheer amount of possibilities in using Maya to control assets like shadows and how reflective a surface can be, though as of yet I have a long ways to go before I can master this program.
Unfortunately I couldn't manage to get a render due to Maya crashing on me consistently which I believe had something to do with me playing around with an ocean texture, but I'll hopefully use my newfound knowledge in future Maya projects.
What worked well:
What could be improved:
Unfortunately I couldn't manage to get a render due to Maya crashing on me consistently which I believe had something to do with me playing around with an ocean texture, but I'll hopefully use my newfound knowledge in future Maya projects.
What worked well:
- The effect of lighting on the different textures within the program
- The ability to toggle certain shadows on and off to make certain light sources stand out
What could be improved:
- Saving often to avoid losing everything every time Maya crashes
Monday, 29 January 2018
Study Task 2 - Character Design and Development (Second Version)
Tracing the line art of the turnaround in Photoshop proved to be nowhere near as difficult as picking an outfit and colour scheme for Beryl. What initially started out as a possible six classic red-and-black designs evolved into over twenty different colour schemes options as I experimented with adding more colours.

I picked what I felt was the best six (both from personal opinion and from the opinions of my peers) and posted it on the forums to get a vote on the best single colour scheme, and these were the choices.

I picked what I felt was the best six (both from personal opinion and from the opinions of my peers) and posted it on the forums to get a vote on the best single colour scheme, and these were the choices.

Once I get a definitive vote I'll go ahead and finish colouring the final turnaround.
Sunday, 28 January 2018
Study Task 4 - Maya 1: Modelling Skills
Keep on Truckin'
In this task we were introduced to Maya and taught how to break down complex shapes into simple polygons for the purpose of modelling. We learned some skills in Maya through modelling a toy truck.

What worked well:
What could be improved:
Do It Yourself
Here we used the skills we learned while modelling our truck to model a simple object readily available to us. I picked a bottle thinking it would be simple. I was somewhat mistaken. I did however feel I did a fairly decent job with it and did have fun with it.

What worked well:
What could be improved:
In this task we were introduced to Maya and taught how to break down complex shapes into simple polygons for the purpose of modelling. We learned some skills in Maya through modelling a toy truck.

What worked well:
- The symmetry in the wheels and axels
- The beveled front window turned out nice
What could be improved:
- Proportions could have been improved here and there
- Some edges look too sharp and could use a bit of beveling
Do It Yourself
Here we used the skills we learned while modelling our truck to model a simple object readily available to us. I picked a bottle thinking it would be simple. I was somewhat mistaken. I did however feel I did a fairly decent job with it and did have fun with it.

What worked well:
- The grooves on the side of the bottle
- The bottle cap turned out well
- The bottom of the bottle took some trial and error but turned out decent in the end.
What could be improved:
- The merging between the different cylinders that made up the body of the bottle didn't mesh as well as I would have liked.
Wednesday, 24 January 2018
Study Task 2 - Character Design and Development (First Version)
This week I made a preliminary design for Beryl the Peril. Even though we're not meant to be writing down the background stories as of yet, I've started to think about it. I noticed that we rarely see Beryl's mother in the comics if ever, and that she shows very little respect to her father. I feel that losing one's mother at a young age would be reason enough to be a peril or a menace as a way of dealing with one's problems, and doubling as an emotional shield at the same time.


I kept some of her features that made her Beryl in the original comics (like her long hair in pigtails) and added things to her clothes to make her look more rebellious, like a jacket and a cap and some tall boots.


I kept some of her features that made her Beryl in the original comics (like her long hair in pigtails) and added things to her clothes to make her look more rebellious, like a jacket and a cap and some tall boots.

Friday, 19 January 2018
Study Task 1 - Research and Refinement
A new module, a new brief! And it's with the Beano! How cool, barely into our first year as animation students and it already feels like we're dipping our toes into the industry!
That aside, we spent this week researching the Beano rebel females to be redesigned which mainly consisted of me going through old comics and drawing said mentioned characters.


That aside, we spent this week researching the Beano rebel females to be redesigned which mainly consisted of me going through old comics and drawing said mentioned characters.


I have personally read the odd Beano here and there during my childhood and was mostly familiar with Dennis the Menace, and I noted that Beryl the Peril seemed to be designed to be the female version of him. I ultimately chose Beryl for the redesign.
Subscribe to:
Posts (Atom)
Sleep Paralysis and You - Final Version
This is the final version of Sleep Paralysis and You after Prathik has composited in all our parts. It's been a long few months an...

-
 In this week's session, we presented the progress we had done on our animations so far to the rest of our peers for a final critique an...
 -
 The group's animation went in an unexpected direction and veered towards a digital cut-out (but still 2D) style. The decision to animat...
 -
 Sleep Paralysis and You Prathik compiled everyone's roughs together and made some notes on what needed to be changed, including some f...